Showing posts with label xaml. Show all posts

Thursday, May 9, 2013

Type forwarding and XAML sharing between WP OS 7.1 and 8.0 projects

    This post is about a new feature available in Windows Phone OS 8.0 SDK called Type Forwarding.

    Have you ever wondered how does the Windows Phone 8.0 SDK handles the fact that the Panorama, Pivot controls changed the namespace and the assembly from OS 7.1 SDK to OS 8.0 SDK? (80% that you haven't :) ). I recently had to migrate an OS 7.1 project to OS 8.0, but also keep the old one (duplicated the old project and upgrade the duplicated one).

    Here is the story of what happens when you upgrade an OS 7.1 project that uses Panaroma or Pivot to OS 8.0:
    If you start a new Windows Phone Pivot App with the target OS 8.0 inside MainPage.xaml the prefix "phone" is used for the Pivot control where "phone" is:

 xmlns:phone="clr-namespace:Microsoft.Phone.Controls;assembly=Microsoft.Phone"  

    If, on the other hand, you create a new Windows Phone Pivot App with the target OS 7.1 inside MainPage.xaml the prefix "controls" is used for the Pivot/Panorama control where "controls" is:

 xmlns:controls="clr-namespace:Microsoft.Phone.Controls;assembly=Microsoft.Phone.Controls"  

    The real "magic" happens when you upgrade the Windows Phone 7.1 project to OS 8.0. The MainPage.xaml page doesn't change (you will still see the "controls" tag is kept in order to be able to better share the code between the versions), but instead a reference to Microsoft.Phone.Controls.dll is added to the OS 8.0 reference that is not used if you create a new project with target OS 8.0. If you wonder if by adding this reference you use the old version of the controls the answer is NO. What this assembly does is that is uses a really neat and new  feature of the .Net compiler called Type Forwarding. This feature can be used when you move a class from one namespace/dll (assembly) to another and you don't want to recompile the application to reference the new dll but you will only deploy the two dlls where the first one (the one that the application already knew uses the Type Forwarding to tell the application that a certain class/es moved to another assembly). In the case of Windows Phone OS 8.0 SDK the usage is even "cooler" as it enables you to use the same XAML for both OS 7.1 projects and OS 8.0 ones. Inside AssemblyInfo.cs of Microsoft.Phone.Controls.dll OS 8.0 version we have all the declarations needed to forward the types to their new locations:

 [assembly: TypeForwardedTo(typeof(Panorama))]  
 [assembly: TypeForwardedTo(typeof(PanoramaItem))]  
 [assembly: TypeForwardedTo(typeof(Pivot))]  
 [assembly: TypeForwardedTo(typeof(PivotItem))]  
 [assembly: TypeForwardedTo(typeof(PivotItemEventArgs))]  
 [assembly: TypeForwardedTo(typeof(AnimationDirection))]  
 [assembly: TypeForwardedTo(typeof(PanningBackgroundLayer))]  
 [assembly: TypeForwardedTo(typeof(PanningLayer))]  
 [assembly: TypeForwardedTo(typeof(PanningTitleLayer))]  
 [assembly: TypeForwardedTo(typeof(PanoramaPanel))]  
 [assembly: TypeForwardedTo(typeof(PivotHeaderItem))]  
 [assembly: TypeForwardedTo(typeof(PivotHeadersControl))]  

I am attaching a small project called TypeForwarding that implements the same functionality as Microsoft.Phone.Controls.dll OS 8.0 version.

Other usages that I can thing of:

  • Flurry SDK changes the name of the namespace for the Api class for WP7SDK to WP8SDK (bad choice when you need code sharing). If you want to keep the same code for the OS 7.1 and the OS 8.0 version of the app you will have to use conditional compiling for every file where you use the Api class. Much easier would be to create an OS 8.0 library project with the default namespace WP7SDK and forward the Api class to the WP8SDK added as a reference to the library project. This way the old WP7SDK will continue to work as it was on the OS 8.0 using the OS 8.0 version of the Flurry SDK.
  • MVVM Light. If you use inside your XAML the EventToCommand this is not xaml shareable between OS 7.1 and OS 8.0 because the assemblies changes from GalaSoft.MvvmLight.Extras.WP71.dll to GalaSoft.MvvmLight.Extras.WP8.dll. The easiest approach in this case (an open source) would be to recompile the dll and use the same name for both versions of the dll. But if you don't have access to the source code of the dll you could use type forwarding.  Also a third approach would be to derive your on class like MyEventToCommand and use this inside the xaml.
Keep in mind this neat feature because you might need it. I would also love to see, in the next version of the SDK, the possibility to use MarkupExtension this way we could conditionally compile parts of the XAML depending on the version of the SDK the app is running on. Have a look at this blog post that explains how it works on WPF projects.


Till next post NAMASTE and have fun coding for Windows Phone!
Tuesday, March 12, 2013

Share localization files between Windows Phone and Windows 8

    As I wrote in my previous post I am getting back with a post on how to share the localization files between Windows Phone and Windows 8. This should be a simple task, but in the current version of the Windows Phone SDK and Windows 8 it cannot be easily done. The target is to have only one of the two projects (Windows Phone or Windows 8) that manages the localized (in this sample I am only taking in consideration localized strings but the concept can be easily extended) and use it in the other project. Also I wanted to use the Multilingual App Toolkit to easily manage the translations inside the project.
    First let's see what we have:
  • Windows Phone + Multilingual App Toolkit
    1. The main resource file is called AppResources.resx and is inside the Resources folder 
    2. The AppResources.resx automatically generates the AppResources class
    3. The files generated by the Multilingual App Toolkit for the Windows Phone project are also inside the "\Resources" folder and the name look like AppResources.[culture].xlf
    4. We have a class called LocalizedStrings.cs that helps us with the binding inside xaml files
  • Windows 8 + Multilingual App Toolkit
    •  The main resource file is called Resources.resw and it is inside the \strings\[Default language] folder
    • The Resources.resw doesn't have .cs class in code behind generated (it uses the ResourceLoader class to load the localized values). We can also have values with "." like MainButton.Text to directly use inside xaml with the x:Uid.
    • The files generated by the Multilingual App Toolkit for Windows 8 are inside the "\MultilingualResources" folder and the names are [AppName]_[culture].xlf
    So we cannot directly use the files from one project to another.  There are a lot of differences but the couples (AppResources.resx, Resources.resw) and all the (AppResources.[culture].xlf, [AppName]_[culture].xlf) have different names but share very similar structure (they share most of the structure). 

     My approach and idea is to automatically generate the set of localized files needed by one solution directly from the set of files of the other project at compilation time. As source I have chosen the Windows Phone resource files (the other way around is more difficult as we could have resources not supported by Windows Phone). In order to automatically generate the resource files I have created a console application that would be run as a Post-build event on the Windows Phone project and write the necessary files to the Windows 8 project. the Windows 8 project build will be set to depend on the Windows Phone project this way we will always have updated resources when we run it. The console application needs three parameters/inputs: the folder of the Windows Phone project (source), the folder of the Windows 8 project (destination), and the name of the Windows 8 project as we will need it when we generate the [AppName]_[culture].xlf files for the Windows 8 project. The console application also automatically generates the AppResources.cs class inside the Windows 8 projects which is a class similar to the one used by Windows Phone. The source code for the Console Application is also included in case you need to do some changes and also the full sample.
     So let's see what would be the steps you will have to make if you want to use the solution.
  1. Create a Windows Phone application (in the attached sample the project WindowsPhoneApp). Using the Tools menu enable the Multilingual App Toolkit and using right-click on the project name select "Add translation languages..." to support more languages (in the sample is italian)
  2. Create the Windows 8 projects (in the attached sample the project called WindowsStoreApp). Create the the folder structure \strings\en and add the file Resources.resw to it. Inside the Package.appxmanifest set the default language as en. Now use the Tools menu and enable the Multilingual App Toolkit on the Windows 8 project and add the same languages that you have added to the Windows Phone Project. 
    If later you want to add another language support remember to add it to both Windows 8 and Windows Phone projects.
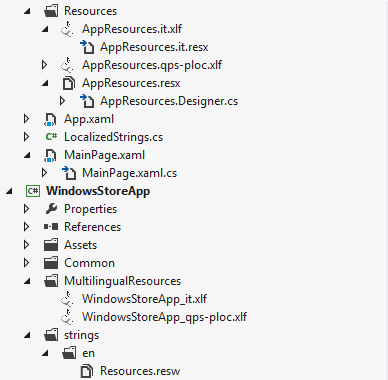
This is how our solution looks :
two different projects each of one with its localization part. Now we will set that the Windows 8 project build depends on the Windows Phone project and set the post-build action of the Windows Phone project to be:

$(SolutionDir)ConvertAppResources\$(OutDir)ConvertAppResources.exe "$(SolutionDir)WindowsPhoneApp" "$(SolutionDir)WindowsStoreApp" WindowsStoreApp

where ConvertAppResources is the project that converts the resources. We pass 3 parameters to the console application:
  1. the folder of the Windows Phone application which is the source - "$(SolutionDir)WindowsPhoneApp"
  2. the folder of the Windows 8 app which is the destination - "$(SolutionDir)WindowsStoreApp"
  3. the name of the Windows 8 app- WindowsStoreApp
In our case the console application will generate and overwrite Resources.resw, WindowsStoreApp_it.xlf and WindowsStoreApp_qps-ploc.xlf. It will also generate the file AppResources.cs in the Windows 8 application folder which you will have to include in the project after the first compilation of the Windows Phone application.
To keep things even more similar to Windows Phone method I have added the class:

 using Localization;  
 namespace WindowsStoreApp  
 {  
   /// <summary>  
   /// Provides access to string resources.  
   /// </summary>  
   public class LocalizedStrings  
   {  
     private static AppResources _localizedResources = new AppResources();  
     public AppResources LocalizedResources { get { return _localizedResources; } }  
   }  
 }  

and inside App.xaml added the resource:

 <Application.Resources>  
     <ResourceDictionary>  
       <local:LocalizedStrings x:Key="LocalizedStrings"/>  
       <ResourceDictionary.MergedDictionaries>  
         <!--   
           Styles that define common aspects of the platform look and feel  
           Required by Visual Studio project and item templates  
          -->  
         <ResourceDictionary Source="Common/StandardStyles.xaml"/>  
       </ResourceDictionary.MergedDictionaries>  
     </ResourceDictionary>  
   </Application.Resources>  

This way you could easily bind in Windows Phone style and even reuse xaml and cs that you already have from your Windows Phone project:
Xaml Binding
  <Button Content="{Binding Path=LocalizedResources.ButtonText, Source={StaticResource LocalizedStrings}}" HorizontalAlignment="Left" VerticalAlignment="Top" Margin="517,302,0,0" Height="100" Width="283" Click="Button_Click"/>  
and/or code-behind:
 MessageDialog md = new MessageDialog(AppResources.ButtonMessage);  

If you want to know more on how the conversion works look inside Program.cs. The steps I do is save the Resx to Resw and generate the class AppResources.cs. After that for every .xlf file in the Windows Phone Resources folder  I generate and write the corresponding Windows 8 .xlf file (there are some conversions involved). If you want you don't have to add the project ConvertAppResources to your solution but only add the output .exe file to one of the projects and be very careful when you write the post-build action command.

Once everything is setup-ed you will only have to modify the Windows Phone resource strings and the Windows 8 ones will get updated. If you want to use specific Windows 8 resources you can add more resource files and use the ResourceLoader to load them - for example if you've added the file Errors.resw to the \strings\en folder of the Windows 8 project you will access it like this:

                var resourceLoader = new ResourceLoader("Errors");
                this.Scenario5TextBlock.Text = resourceLoader.GetString("InvalidOperation");


Be careful:

  • before adding the post-build action verify that the localization of both Windows Phone and Windows 8 project work (independent from each other) 
  • if the post-build command is not right the Windows 8 application will not get the updated resources when you compile the windows phone project
  • the Window 8 project has to depend on the Windows Phone project this way you will be sure that Windows 8 gets the updated resources
  • modify ONLY the Windows Phone .resx and .xlf files

Some limitations of the Multilingaul App Toolkit:

  • If you modify the Resx file and add a new resource you will have compile the project before you will see the new string in the .xlf files
  • If you are modifying the Resx file for a resource that you have already localized when you compile you will loose the localization and you will have to modify the .xlf files again.  


Let me know if you have problems understanding or making it work (I don't think that I was really good at explaining the process but the hack works).


SOURCE CODE

NAMASTE

Wednesday, February 20, 2013

How to build a multi-touch control for Windows Phone

     What I intend for multi-touch? Windows Phone is already a multi-touch device but for some reason (I guess it is legacy of Silverlight) the standard Xaml controls don’t have a real multi-touch behavior. Real multi-touch means that I should be able to interact with two different objects at the same time with multiple fingers. What happens now for the XAML standard controls is that once a control start receiving touch events (ManipulationStarted, ManipulationEnded, ManipulationDelta) all the other controls will not receive touch events. The easiest test to do is add a standard button on the page, put one finger on the screen outside the button and try to press the button with another finger. You will see that the button does not respond to your commands. For Xaml applications this might not be a problem, but for games it becomes one. Xaml (I mean Xaml+C# or XAML+VB.NET) is fast to develop easy games.

The solution would be to build your own control and use Touch.FrameReported to “drive” it. In this sample I will build a multi-touch button. I will call it ButtonEx (some of you remember OpenNETCF J ?) and I will just add three events to it: TouchDown, TouchUpInside, TouchUpOutSide (iOs MonoTouch event names). With this three events I should have better control (Click in reality is a TouchUpInside event) .
So I've created a new Windows Phone Class Library called ControlsEx and I added the control ButtonEx derived from ContentControl. I copied the standard style of the Button control (you can easily generate it from a standard button using Blend and Edit Copy command on the Button Template). I've then added the style to the /Themes/generic.xaml file inside our project.  When I create the control I will subscribe Loaded and Unloaded events as I want to start receiving Touch events when the control loads and unsubscribe the Touch events when the control gets unloaded.

  public ButtonEx()  
     {  
       DefaultStyleKey = typeof(ButtonEx);  
       this.Loaded += ButtonEx_Loaded;  
       this.Unloaded += ButtonEx_Unloaded;  
       IsEnabledChanged += ButtonEx_IsEnabledChanged;  
       IsPressed = false;  
     }  
     void ButtonEx_Loaded(object sender, RoutedEventArgs e)  
     {  
       Touch.FrameReported += Touch_FrameReported;  
     }  
     void ButtonEx_Unloaded(object sender, RoutedEventArgs e)  
     {  
       Touch.FrameReported -= Touch_FrameReported;  
     }  

     Now everything we need “happens” inside the Touch_FrameReported  method. For my button I am interested to trace only one finger(using its id) from TouchAction.Down until TouchAction.Up. Once the first finger is down on the surface of my control I memorize the id and track it’s actions till it leaves the screen. Depending of the control that you are building you might have to take in consideration multiple fingers. One thing that is pretty important when starting to track a finger is to see if your control is in front or not (imagine an MessageBox over your controls and when you press the Ok button you will also press the button which is in the back). To resolve this issue I’ve used TouchDevice.DirectlyOver property of the TouchPoint and the VisualTreeHelper to see if the UIElement returned by DirectlyOver is a member of my control or not.
  bool IsControlChild(DependencyObject element)  
     {  
       DependencyObject parent = element;  
       while ((parent != this) && (parent != null))  
         parent=VisualTreeHelper.GetParent(parent);  
       if (parent == this)  
         return true;  
       else  
         return false;  
     }  
Here is the method Touch_FrameReported method:

 void Touch_FrameReported(object sender, TouchFrameEventArgs e)  
     {  
       if (Visibility == Visibility.Collapsed)  
         return;  
       TouchPointCollection pointCollection = e.GetTouchPoints(this);  
       for (int i = 0; i < pointCollection.Count; i++)  
       {  
         if (idPointer == -1)  
         {  
           if (IsEnabled&&(Visibility==Visibility.Visible) && (pointCollection[i].Action == TouchAction.Down) && IsControlChild(pointCollection[i].TouchDevice.DirectlyOver))  
           {  
             //start tracing this finger  
             idPointer = pointCollection[i].TouchDevice.Id;  
             IsPressed = true;  
             VisualStateManager.GoToState(this,"Pressed", true);  
             if (TouchDown != null)  
               TouchDown(this, pointCollection[i].Position);  
           }  
         }  
         else if ((pointCollection[i].TouchDevice.Id == idPointer) && (pointCollection[i].Action == TouchAction.Up))  
         {  
           idPointer =-1;  
           IsPressed = false;  
           UpdateIsEnabledVisualState();  
           if ((pointCollection[i].Position.X > 0 && pointCollection[i].Position.X < ActualWidth) && (pointCollection[i].Position.Y > 0 && pointCollection[i].Position.Y < ActualHeight))  
           {  
             if (TouchUpInside != null)  
               TouchUpInside(this, pointCollection[i].Position);  
           }  
           else  
           {  
             if (TouchUpOutside != null)  
               TouchUpOutside(this, pointCollection[i].Position);  
           }  
         }  
       }   
     }  
    For the button control we don’t have to trace the movements of the finger until Up action but we might need to if we are writing a Slider control for example. The sample application that you will find in the source code uses 2 ButtonEx controls and a standard Button control. The ButtonEx should always respond to your commands (fingers).

    I’ve also used this approach to develop an multi-touch XAML game for flying an Bluetooth BeeWi helicopter. I will also have a session on the 27th February at Community Days here in Italy where I will present a session on developing a game for Windows Phone and I will use this game as a starting point. This application has multi-touch buttons, slider and joystick control.

Also have to thank the TTT (Train The Trainer) program which awarded me a beautiful Sphero for my multi-touch controls.

As always don’t hesitate to contact me if you have further questions.
NAMASTE