Showing posts with label wpdev. Show all posts

Saturday, September 21, 2013

Retrieve pitch and roll from the accelerometer data [Update]

UPDATE:
You will find an updated version of this post HERE

    So what happens if you designed your application to drive a bluetooth device using the Motion class (because the output is less noisy) and then you realize that on the Lumia 520 and Lumia 625 the Motion class is not supported and you have to use the accelerometer. In my case, as i only use pitch and roll,  the solution was pretty simple as it is actually possible to calculate the pitch and roll values directly from the accelerometer data. This way I can still use the Motion class and when not available fallback on the data extracted from the accelerometer. To better understand the algorithm behind this transformation have a look at this LINK.
     Before applying the transformation I also apply a low-pass filter to remove short-term fluctuations. The difference between the Arduino sample is that the pitch and roll are inverted and also the pitch was 180 degrees off so I remapped the values (when holding in postion 0 it was telling 180 degrees). I also transformed from radians to degrees for easier visualization (the multiplication with 180/Math.Pi)

     const double alpha = 0.5;  
     double fXg = 0;  
     double fYg = 0;  
     double fZg = 0;  
     void acc_ReadingChanged(Windows.Devices.Sensors.Accelerometer sender, AccelerometerReadingChangedEventArgs args)  
     {  
       //Low Pass Filter  
       fXg = args.Reading.AccelerationX * alpha + (fXg * (1.0 - alpha));  
       fYg = args.Reading.AccelerationY * alpha + (fYg * (1.0 - alpha));  
       fZg = args.Reading.AccelerationZ * alpha + (fZg * (1.0 - alpha));  
       //Roll & Pitch Equations  
       double pitch = (Math.Atan2(-fYg, fZg) * 180.0) / Math.PI;  
       double roll = (Math.Atan2(fXg, Math.Sqrt(fYg * fYg + fZg * fZg)) * 180.0) / Math.PI;  
       //rotate 180 degrees  
       pitch=(pitch>=0)?(180-pitch):(-pitch-180);  
     }  

     I have also built a small sample that does comparative plots of the two values using the motion class and the transformation from accelerometer data. Initially I have added also the Microsoft.Devices.Sensors.Accelerometer but the data is almost the same with Windows.Devices.Sensors.Accelerometer with small delays between updates.


    Here is the  SOURCE CODE of the sample.

Saturday, August 31, 2013

Add side menus to an Windows Phone application (similar to the Facebook app)

     It is been a while since my last post, but I have a good reason (on the 20th of July - so tired that the first time I've mistaken the date by one month -  my son Mattia was born and between work and my duties and no sleep there is not much time left for writing on my blog even if I have a lot of posts that I want to do).  
     I will get right to the subject (the title is not one of the best chosen). A few days ago I was talking with my friend Alessandro Scardova about the possibility of implementing side menus inside an Windows Phone application (similar to the ones in the Facebook application). Even if not 100%"Modern UI" design it is a good approach for applications that have multiple options that need to be accessed quickly (also the approach can be applied cross-platform). So I took it as a challange and tried to implement it.
     My initial thought was that I might be able to implement it using an templated panorama or pivot, but after some tests I was not able to get the desired behaviour:


  • when we start the application we will have the selected ViewPort selected
  • swiping left or right we can open/close the side menus
  • also using the buttons on the upper left and on the right corners we can also close and open the side menus
  • the side menus have a width smaller than 480 this way, when opened, we can still see a part of main viewport (including the upper button)
  • when opening the menus the ApplicationBar is not visible
     The solution I have implemented (doesn't use MVVM pattern) it is more a proof of concept on how to implement the functionality. The approach is pretty simple. We have the whole view that we move inside a canvas using manipulations and animations. Initially I thought that I can use only  grid without the canvas and animate the margin of the grid but, as Windows Phone doesn't have ThicknessAnimation, my animations for opening and closing the menus were not very smooth. Also I've tried implementing the swipe behaviour using the Touch.FrameReported event but the results I got were not very good.

     So how does my implementation work:
  • I have a canvas/grid that has a width of 1320 and the height stretches to the whole available height that contains my whole view
  • The view is inserted in a canvas with initial Canvas.Left position set to -420 this way we see the main view port (component)
  • The "stable" positions inside the canvas are:  0: left menu opened, -420: main view and -840:right menu opened
  • When pressing the buttons we will use a resource Storyboard with a  DoubleAnimation to set the the Canvas.Left position inside the canvas to 0,-420 or -840:
  <Canvas.Resources>  
       <Storyboard x:Name="moveAnimation">  
         <DoubleAnimation Duration="0:0:0.2" To="0" Storyboard.TargetProperty="(Canvas.Left)" Storyboard.TargetName="LayoutRoot" d:IsOptimized="True" />  
       </Storyboard>  
     </Canvas.Resources>  

Use the animation to open/close the menus:
  void MoveViewWindow(double left)  
     {  
       _viewMoved = true;  
       if (left==-420)  
         ApplicationBar.IsVisible = true;  
       else  
         ApplicationBar.IsVisible = false;  
       ((Storyboard)canvas.Resources["moveAnimation"]).SkipToFill();  
       ((DoubleAnimation)((Storyboard)canvas.Resources["moveAnimation"]).Children[0]).To = left;  
       ((Storyboard)canvas.Resources["moveAnimation"]).Begin();  
     }  

  • To implement the swipe I use the ManipulationStarted, ManipulationDelta and ManipulationEnded on the canvas container. On delta we set the Canvas.Left value directly (no need for animations) between a maximum of 0 and a minimum of -840.
  private void canvas_ManipulationDelta(object sender, ManipulationDeltaEventArgs e)  
     {  
       if (e.DeltaManipulation.Translation.X != 0)  
         Canvas.SetLeft(LayoutRoot, Math.Min(Math.Max(-840, Canvas.GetLeft(LayoutRoot) + e.DeltaManipulation.Translation.X), 0));  
     }  

  • when swiping we also memorize the initial Canvas.Left position. If substracting the final Canvas.Left and the initial one the absolute value is lower then 100 (not a long swipe) we bounce back to the initial position. Otherwise we move to the next position.
  private void canvas_ManipulationCompleted(object sender, ManipulationCompletedEventArgs e)  
     {  
       var left = Canvas.GetLeft(LayoutRoot);  
       if (_viewMoved)  
         return;  
       if (Math.Abs(initialPosition - left) < 100)  
       {  
         //bouncing back  
         MoveViewWindow(initialPosition);  
         return;  
       }  
       //change of state  
       if (initialPosition - left > 0)  
       {  
         //slide to the left  
         if (initialPosition > -420)  
            MoveViewWindow(-420);  
         else  
           MoveViewWindow(-840);  
       }  
       else  
       {  
         //slide to the right  
         if (initialPosition< -420)  
            MoveViewWindow(-420);  
         else  
           MoveViewWindow(0);  
       }  
     }  


  • _viewMoved is used to see if the view was already moved by another event since our manipulation started (like a button was pressed)
   Here are some screenshots from the sample that you can download and play with:

   Hope you will find it useful.

Here is the SOURCE CODE

NAMASTE!

Sunday, March 24, 2013

Small tip on XAudio2 for Windows Phone

     While debugging one of my Windows Phone applications on the device I've noticed that after the debug session the battery of the device drained faster than usual (so I always restarted the device after using it for debugging). Initially I thought it was the Bluetooth driver but I saw that if I stop the XAudio2 engine when my application gets suspended and re-enable it when the application resumes my battery drains "normally". This should be a best practice as your application doesn't really need the engine when it gets suspended. So:


NAMASTE

Friday, March 22, 2013

How to add songs to the emulator's MediaLibrary

    One of the new features of the Windows Phone 8 SDK is the ability to save(add) songs to the phone's MediaLibrary. This is a really nice when you add songs to the MediaLibrary any other music application that you have installed on your phone can play the songs that your application has saved.. The SaveSong method is found in the MediaLibraryExtensions class. Here are the parameters of this method:

[ExtensionAttribute]

public static Song SaveSong (
         MediaLibrary library,
         Uri filename,
         SongMetadata songMetadata,
         SaveSongOperation operation
)

    The method requires the ID_CAP_MEDIALIB_AUDIO capability and will return a reference to the newly saved song. One of the things that the documentation forgot to mention is that the filename Uri has to be an Uri to a file on the IsolatedStorage. You cannot give a direct Uri to an asset file (this I think because using the SaveSongParameter you can choose if you want to copy or move the file to the MediaLibrary) as you will get InvalidOperationException. If you want to add a song deployed as an asset you will first have to copy the file to the IsolatedStorage and then save it to the MediaLibrary.

    To copy the file to the IsolatedStorage you can use the:
 var resource = Application.GetResourceStream(new Uri(@"Assets/Songs/"+fileName, UriKind.Relative));  
 resource.Stream.CopyTo(fileStream, 4096);  


or you can use the WinRT Api to read the asset file:
  songUri=new Uri("ms-appx:///Assets/Songs/"+fileName,UriKind.Absolute);  
  var file=await Windows.Storage.StorageFile.GetFileFromApplicationUriAsync(songUri);  

 
    One interesting parameter is the SongMetadata. This enables you to "mess" with the metadata that will be saved to the MediaLibrary. If this parameter is null then the function will automatically import the file's metadata. If you still want to verify/import just some of the files metadata you can use the PCL ID3.NET and read the metadata of the file you have on the Isolated Storage. The portble dll is Id3.dll. You just have to pass the Stream to the Mp3Stream method:

 Id3.Mp3Stream mp3 = new Id3.Mp3Stream(resource.Stream);  
 if (mp3.HasTags)  
 {  
 }  


NAMASTE

Tuesday, March 12, 2013

Share localization files between Windows Phone and Windows 8

    As I wrote in my previous post I am getting back with a post on how to share the localization files between Windows Phone and Windows 8. This should be a simple task, but in the current version of the Windows Phone SDK and Windows 8 it cannot be easily done. The target is to have only one of the two projects (Windows Phone or Windows 8) that manages the localized (in this sample I am only taking in consideration localized strings but the concept can be easily extended) and use it in the other project. Also I wanted to use the Multilingual App Toolkit to easily manage the translations inside the project.
    First let's see what we have:
  • Windows Phone + Multilingual App Toolkit
    1. The main resource file is called AppResources.resx and is inside the Resources folder 
    2. The AppResources.resx automatically generates the AppResources class
    3. The files generated by the Multilingual App Toolkit for the Windows Phone project are also inside the "\Resources" folder and the name look like AppResources.[culture].xlf
    4. We have a class called LocalizedStrings.cs that helps us with the binding inside xaml files
  • Windows 8 + Multilingual App Toolkit
    •  The main resource file is called Resources.resw and it is inside the \strings\[Default language] folder
    • The Resources.resw doesn't have .cs class in code behind generated (it uses the ResourceLoader class to load the localized values). We can also have values with "." like MainButton.Text to directly use inside xaml with the x:Uid.
    • The files generated by the Multilingual App Toolkit for Windows 8 are inside the "\MultilingualResources" folder and the names are [AppName]_[culture].xlf
    So we cannot directly use the files from one project to another.  There are a lot of differences but the couples (AppResources.resx, Resources.resw) and all the (AppResources.[culture].xlf, [AppName]_[culture].xlf) have different names but share very similar structure (they share most of the structure). 

     My approach and idea is to automatically generate the set of localized files needed by one solution directly from the set of files of the other project at compilation time. As source I have chosen the Windows Phone resource files (the other way around is more difficult as we could have resources not supported by Windows Phone). In order to automatically generate the resource files I have created a console application that would be run as a Post-build event on the Windows Phone project and write the necessary files to the Windows 8 project. the Windows 8 project build will be set to depend on the Windows Phone project this way we will always have updated resources when we run it. The console application needs three parameters/inputs: the folder of the Windows Phone project (source), the folder of the Windows 8 project (destination), and the name of the Windows 8 project as we will need it when we generate the [AppName]_[culture].xlf files for the Windows 8 project. The console application also automatically generates the AppResources.cs class inside the Windows 8 projects which is a class similar to the one used by Windows Phone. The source code for the Console Application is also included in case you need to do some changes and also the full sample.
     So let's see what would be the steps you will have to make if you want to use the solution.
  1. Create a Windows Phone application (in the attached sample the project WindowsPhoneApp). Using the Tools menu enable the Multilingual App Toolkit and using right-click on the project name select "Add translation languages..." to support more languages (in the sample is italian)
  2. Create the Windows 8 projects (in the attached sample the project called WindowsStoreApp). Create the the folder structure \strings\en and add the file Resources.resw to it. Inside the Package.appxmanifest set the default language as en. Now use the Tools menu and enable the Multilingual App Toolkit on the Windows 8 project and add the same languages that you have added to the Windows Phone Project. 
    If later you want to add another language support remember to add it to both Windows 8 and Windows Phone projects.
This is how our solution looks :
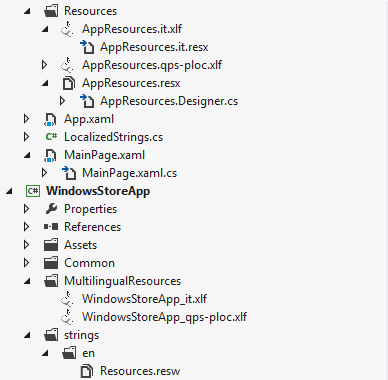
two different projects each of one with its localization part. Now we will set that the Windows 8 project build depends on the Windows Phone project and set the post-build action of the Windows Phone project to be:

$(SolutionDir)ConvertAppResources\$(OutDir)ConvertAppResources.exe "$(SolutionDir)WindowsPhoneApp" "$(SolutionDir)WindowsStoreApp" WindowsStoreApp

where ConvertAppResources is the project that converts the resources. We pass 3 parameters to the console application:
  1. the folder of the Windows Phone application which is the source - "$(SolutionDir)WindowsPhoneApp"
  2. the folder of the Windows 8 app which is the destination - "$(SolutionDir)WindowsStoreApp"
  3. the name of the Windows 8 app- WindowsStoreApp
In our case the console application will generate and overwrite Resources.resw, WindowsStoreApp_it.xlf and WindowsStoreApp_qps-ploc.xlf. It will also generate the file AppResources.cs in the Windows 8 application folder which you will have to include in the project after the first compilation of the Windows Phone application.
To keep things even more similar to Windows Phone method I have added the class:

 using Localization;  
 namespace WindowsStoreApp  
 {  
   /// <summary>  
   /// Provides access to string resources.  
   /// </summary>  
   public class LocalizedStrings  
   {  
     private static AppResources _localizedResources = new AppResources();  
     public AppResources LocalizedResources { get { return _localizedResources; } }  
   }  
 }  

and inside App.xaml added the resource:

 <Application.Resources>  
     <ResourceDictionary>  
       <local:LocalizedStrings x:Key="LocalizedStrings"/>  
       <ResourceDictionary.MergedDictionaries>  
         <!--   
           Styles that define common aspects of the platform look and feel  
           Required by Visual Studio project and item templates  
          -->  
         <ResourceDictionary Source="Common/StandardStyles.xaml"/>  
       </ResourceDictionary.MergedDictionaries>  
     </ResourceDictionary>  
   </Application.Resources>  

This way you could easily bind in Windows Phone style and even reuse xaml and cs that you already have from your Windows Phone project:
Xaml Binding
  <Button Content="{Binding Path=LocalizedResources.ButtonText, Source={StaticResource LocalizedStrings}}" HorizontalAlignment="Left" VerticalAlignment="Top" Margin="517,302,0,0" Height="100" Width="283" Click="Button_Click"/>  
and/or code-behind:
 MessageDialog md = new MessageDialog(AppResources.ButtonMessage);  

If you want to know more on how the conversion works look inside Program.cs. The steps I do is save the Resx to Resw and generate the class AppResources.cs. After that for every .xlf file in the Windows Phone Resources folder  I generate and write the corresponding Windows 8 .xlf file (there are some conversions involved). If you want you don't have to add the project ConvertAppResources to your solution but only add the output .exe file to one of the projects and be very careful when you write the post-build action command.

Once everything is setup-ed you will only have to modify the Windows Phone resource strings and the Windows 8 ones will get updated. If you want to use specific Windows 8 resources you can add more resource files and use the ResourceLoader to load them - for example if you've added the file Errors.resw to the \strings\en folder of the Windows 8 project you will access it like this:

                var resourceLoader = new ResourceLoader("Errors");
                this.Scenario5TextBlock.Text = resourceLoader.GetString("InvalidOperation");


Be careful:

  • before adding the post-build action verify that the localization of both Windows Phone and Windows 8 project work (independent from each other) 
  • if the post-build command is not right the Windows 8 application will not get the updated resources when you compile the windows phone project
  • the Window 8 project has to depend on the Windows Phone project this way you will be sure that Windows 8 gets the updated resources
  • modify ONLY the Windows Phone .resx and .xlf files

Some limitations of the Multilingaul App Toolkit:

  • If you modify the Resx file and add a new resource you will have compile the project before you will see the new string in the .xlf files
  • If you are modifying the Resx file for a resource that you have already localized when you compile you will loose the localization and you will have to modify the .xlf files again.  


Let me know if you have problems understanding or making it work (I don't think that I was really good at explaining the process but the hack works).


SOURCE CODE

NAMASTE

Friday, March 8, 2013

Easily localize your Windows Phone applications using the Multilingual App Toolkit

  Great news for Windows Phone developers. Today Microsoft released an updated version of its Multilingual App Toolkit for Visual Studio 2012 that supports also Windows Phone projects (the previous version only supported Windows Store projects). You can download the Visual Studio Extension from HERE. The extension itself is multilingual:
   So why is this extension so great in my opinion? As you probably know Windows Phone projects in Visual Studio already support multilingual localization for the applications based on .resw files. The Multilingual App Toolkit adds support for localization industry-standard XLIFF file format and also connects with the Microsoft Translator for quick translation suggestions.
  Lets have a quick looks on how it works. After you have installed the extension you will find a new menu entry inside the Visual Studio 2012 Tools menu with which you can enable or disable the Multilingual App Toolkit for your Windows Phone project.

 Once you have enabled the Multilingual App Toolkit Visual Studio added the XLIFF support and also generates the AppResources.qps-ploc.xlf which is the pseudo-language engine that helps identify translation issues during development. 
   From this moment you will USE ONLY the AppResources.resx file to add new resource strings and the extension (at compilation) will add the missing strings to the corresponding .xlf file. 
    To add new languages to your application you will only have to select the desired language as supported in the project Properties inside the Application section. Once a language is selected the extension automatically generates the corresponding Xlf file.

    You can then double click on the xlf file and Visual Studio will open the Multilingual Editor that enablesyou to edit the translation. If you add new strings to your AppResources.resx file remember to compile the project before opening the .xlf file or you will not see the newly added strings.

  Now with these 3-4 easy simple steps we have localized our application. You can use the the Microsoft Translator in order to have some suggestions but you should always double-check the translation in order to avoid strange translations and situations ("My Application" in italian is translated as "La mia domanda" which actually means My question).


  If you are building a test application remember to add the binding to the resource strings inside your .xaml and .cs files ({Binding Path=LocalizedResources.ApplicationTitle, Source={StaticResource LocalizedStrings}}" Style="{StaticResource PhoneTextNormalStyle} for Xaml or AppResources.value for .cs  )
 Some words about the AppResources.qps-ploc.xlf pseudo language file. Pseudo Language is an artificial modification of the software product intended to simulate real language localization. The pseudo language can be used to detect potential localizability issues or bugs early in the project cycle, before the actual localization starts. For more details about localizability testing with Pseudo Language see Localizability Testing. Inside Visual Studio if you right click on the Pseudo Language file you can select the Generate pseudo translations. 

In order to test it you will have to set the qps-ploc culture for the Application UI. Just add these 3 lines to your Application constructor (but remember to take them out when you don't need them anymore):

  public App()  
     {  
       var ci = new System.Globalization.CultureInfo("qps-ploc");  
       Thread.CurrentThread.CurrentCulture = ci;  
       Thread.CurrentThread.CurrentUICulture = ci;  


 More details on how to use the Multilingual App Toolkit can be found HERE.

 It is really great that Microsoft is migrating the localization of the apps to an open standard. I will get back to this subject with a post on how to share the same xlf files between windows phone and windows 8 projects)

NAMASTE

Wednesday, February 20, 2013

How to build a multi-touch control for Windows Phone

     What I intend for multi-touch? Windows Phone is already a multi-touch device but for some reason (I guess it is legacy of Silverlight) the standard Xaml controls don’t have a real multi-touch behavior. Real multi-touch means that I should be able to interact with two different objects at the same time with multiple fingers. What happens now for the XAML standard controls is that once a control start receiving touch events (ManipulationStarted, ManipulationEnded, ManipulationDelta) all the other controls will not receive touch events. The easiest test to do is add a standard button on the page, put one finger on the screen outside the button and try to press the button with another finger. You will see that the button does not respond to your commands. For Xaml applications this might not be a problem, but for games it becomes one. Xaml (I mean Xaml+C# or XAML+VB.NET) is fast to develop easy games.

The solution would be to build your own control and use Touch.FrameReported to “drive” it. In this sample I will build a multi-touch button. I will call it ButtonEx (some of you remember OpenNETCF J ?) and I will just add three events to it: TouchDown, TouchUpInside, TouchUpOutSide (iOs MonoTouch event names). With this three events I should have better control (Click in reality is a TouchUpInside event) .
So I've created a new Windows Phone Class Library called ControlsEx and I added the control ButtonEx derived from ContentControl. I copied the standard style of the Button control (you can easily generate it from a standard button using Blend and Edit Copy command on the Button Template). I've then added the style to the /Themes/generic.xaml file inside our project.  When I create the control I will subscribe Loaded and Unloaded events as I want to start receiving Touch events when the control loads and unsubscribe the Touch events when the control gets unloaded.

  public ButtonEx()  
     {  
       DefaultStyleKey = typeof(ButtonEx);  
       this.Loaded += ButtonEx_Loaded;  
       this.Unloaded += ButtonEx_Unloaded;  
       IsEnabledChanged += ButtonEx_IsEnabledChanged;  
       IsPressed = false;  
     }  
     void ButtonEx_Loaded(object sender, RoutedEventArgs e)  
     {  
       Touch.FrameReported += Touch_FrameReported;  
     }  
     void ButtonEx_Unloaded(object sender, RoutedEventArgs e)  
     {  
       Touch.FrameReported -= Touch_FrameReported;  
     }  

     Now everything we need “happens” inside the Touch_FrameReported  method. For my button I am interested to trace only one finger(using its id) from TouchAction.Down until TouchAction.Up. Once the first finger is down on the surface of my control I memorize the id and track it’s actions till it leaves the screen. Depending of the control that you are building you might have to take in consideration multiple fingers. One thing that is pretty important when starting to track a finger is to see if your control is in front or not (imagine an MessageBox over your controls and when you press the Ok button you will also press the button which is in the back). To resolve this issue I’ve used TouchDevice.DirectlyOver property of the TouchPoint and the VisualTreeHelper to see if the UIElement returned by DirectlyOver is a member of my control or not.
  bool IsControlChild(DependencyObject element)  
     {  
       DependencyObject parent = element;  
       while ((parent != this) && (parent != null))  
         parent=VisualTreeHelper.GetParent(parent);  
       if (parent == this)  
         return true;  
       else  
         return false;  
     }  
Here is the method Touch_FrameReported method:

 void Touch_FrameReported(object sender, TouchFrameEventArgs e)  
     {  
       if (Visibility == Visibility.Collapsed)  
         return;  
       TouchPointCollection pointCollection = e.GetTouchPoints(this);  
       for (int i = 0; i < pointCollection.Count; i++)  
       {  
         if (idPointer == -1)  
         {  
           if (IsEnabled&&(Visibility==Visibility.Visible) && (pointCollection[i].Action == TouchAction.Down) && IsControlChild(pointCollection[i].TouchDevice.DirectlyOver))  
           {  
             //start tracing this finger  
             idPointer = pointCollection[i].TouchDevice.Id;  
             IsPressed = true;  
             VisualStateManager.GoToState(this,"Pressed", true);  
             if (TouchDown != null)  
               TouchDown(this, pointCollection[i].Position);  
           }  
         }  
         else if ((pointCollection[i].TouchDevice.Id == idPointer) && (pointCollection[i].Action == TouchAction.Up))  
         {  
           idPointer =-1;  
           IsPressed = false;  
           UpdateIsEnabledVisualState();  
           if ((pointCollection[i].Position.X > 0 && pointCollection[i].Position.X < ActualWidth) && (pointCollection[i].Position.Y > 0 && pointCollection[i].Position.Y < ActualHeight))  
           {  
             if (TouchUpInside != null)  
               TouchUpInside(this, pointCollection[i].Position);  
           }  
           else  
           {  
             if (TouchUpOutside != null)  
               TouchUpOutside(this, pointCollection[i].Position);  
           }  
         }  
       }   
     }  
    For the button control we don’t have to trace the movements of the finger until Up action but we might need to if we are writing a Slider control for example. The sample application that you will find in the source code uses 2 ButtonEx controls and a standard Button control. The ButtonEx should always respond to your commands (fingers).

    I’ve also used this approach to develop an multi-touch XAML game for flying an Bluetooth BeeWi helicopter. I will also have a session on the 27th February at Community Days here in Italy where I will present a session on developing a game for Windows Phone and I will use this game as a starting point. This application has multi-touch buttons, slider and joystick control.

Also have to thank the TTT (Train The Trainer) program which awarded me a beautiful Sphero for my multi-touch controls.

As always don’t hesitate to contact me if you have further questions.
NAMASTE

Wednesday, December 26, 2012

C# XAudio2 Sound Playback for Windows Phone

     Let's begin with a small introduction to XAudio2:
     XAudio2 is a low-level audio API. It provides a signal processing and mixing foundation for games that is similar to its predecessors, DirectSound and XAudio. XAudio2 is the replacement for both DirectSound and XAudio.
     XAudio2 abstracts audio generation by separating sound data from "voice", allowing each voice to be filtered by programmable digital signal processing and effects processing functions. Voices can be "submixed" together into a single stream. There is always only one Mastering Voice that outputs the result using WASAPI.

     XAudio2 is primarily intended for developing high performance audio engines for games. For game developers who want to add sound effects and background music to their modern games, XAudio2 offers an audio graph and mixing engine with low-latency and support for dynamic buffers, synchronous sample-accurate playback, and implicit source rate conversion. Compared to WASAPI, XAudio2 requires only a minimum amount of code even for complex audio solutions. Compared to the Media Foundation engine, XAudio2 is a low-level, low-latency C++ API that is designed for use in games.
     XAudio2 cannot be used for background music - for this task you will have to use the IMFMediaEngine. XAudio2 cannot be used for capturing audio - for this task you will have to use WASAPI. Do not use XAudio2 for media playback. For that task you can use MediaElement
    XAudio2 is part of the DirectX api that is included in the new Windows Phone 8 SDK. The Api is shared between Windows 8 and Windows Phone 8 which means that you will be able to fully reuse your source code on both platforms. 

If you want to use XAudio2 for your C#/VB/HTML code you have two options:
1. Use SharpDX . SharpDX is a wrapper of the DirectX Api under .Net platform. Theoretically you can use it to call XAudio2 api directly from your managed code. Practically what happens is that the .Net CLR/GC on ARM seem to block native threads so your audio will shutter/glitch in certain conditions. I had the same problem when I was developing our Windows 8 game Kids' Orchestra and the audio had glitches even on a core i7 processor.
2. The other option, which from my experience works better, is to develop an Windows Phone Runtime Component that will manage the XAudio2 part and expose the needed methods/events to the managed code.

      To better understand how it is done I took the Windows 8 sample XAudio2 audio file playback sample C++ from MSDN and ported to Windows Phone 8 by splitting it in two projects: The C#/Xaml part for the UI and the "audio" project which is a Windows Phone Runtime component developed in C++.
     The porting was pretty easy. I only had to re-code the player class to make it "visible" to the managed code project and added an event that will tell you when a certain Source Voice has finished playing its buffer/sound (we have 7 sounds and each sound has a Source Voice associated to it). If you need further details on how to write a Windows Phone Runtime component in C++ have a look at this  MSDN Post

    This sample only plays Wav files that are resources in the C++ project. You could also dynamically generate sounds in managed code and pass the Wave/buffer data as a byte[] to the runtime component. Inside the native code you will then generate an XAUDIO2_BUFFER and submit it to a Source Voice for playing.

     I have attached the SOURCE CODE for the Windows Phone project. If you have problems with it don't hesitate to contact me.

NAMASTE!