Tuesday, November 19, 2013

Add/Remove Music and Video folders from Windows 8.1 Store Applications

    This is a functionality so buried inside the MSDN documentation that I had to "look" at another application that uses it and only after I was able to find the documentation for it. For the moment (guess because it was not given enough visibility yet) I think there is only one store application that uses it and it is, of course, built by Microsoft (not even Nokia Music application uses it). 
    So what is this all about? If you develop a store application that uses the MusicLibrary capability, you can access to the audio files inside the Music library folders. The problem, until now, was that there was no way to add/remove folders to/from the Music library inside a store application so, in case the user did not had any folder added to the Music library the developers had to find a way to explain how to manually add folders to the Music library (a mess believe me).
    The missing functionality is implemented by the NEW StorageLibrary class available for Windows 8.1 store applications. The class is actually a diamond in the rough:


    The usage is basic but it is exactly what I needed. You need to use the GetLibraryAsync method to retrieve the StorageLibrary you need. Once you have it you can retrieve the StorageFolders currently added to the library and for the Music and Videos libraries, you can add or remove folders from this library. If removing a folder from the library the user will be prompted if he agrees with the removal. For adding a folder using the async method the user will be prompted with a folder picker and returns the newly added StorageFolder, otherwise null.
    As usually I really hope that, if you need it, this blog post will spare you the hours I've spent in finding out how it is done.

Update: There is also a code sample available on msdn Library management sample

NAMASTE


Sunday, November 17, 2013

What Windows Phone Start screen should learn/inherit from Windows 8.1

    Last week I did a session on live tiles and it got me thinking on how Microsoft and the Windows Phone team could actually improve the Start screen experience and also the application list that, in my opinion, lacks design and more important it is not very practical to use. Please consider that i am not a designer and i did not have time to invest in doing the screenshots (did cut and paste using Paint.Net). I am doing this post just to illustrate my ideas.
    Let me start with the start screen. The live tiles are an awesome feature and really differentiate Windows and Windows Phone from their competitors.  I think that, for certain functionality,the Windows 8.1/8 start screen is better than the Windows Phone one. First of all (and the most important) the Scroll Direction. The windows phone have the start screen in vertical compared to Windows 8 which is horizontal. Horizontal scrolling would be better and here are some reasons why I think this:
  • the main reason why you scroll is because you did not find what you were looking for so you would like to reach the part you are interested as fast as possible. All Windows Phone have the height > width in Pixels so scrolling horizontally you actually scroll MORE information than scrolling vertically 
  • If scrolling would be horizontal it would be possible to implement grouping just like Windows 8 and enable a functionality similar to semantic zoom or jump list to easily reach the tile/tiles you need
  • It would be also more familiar to people coming from other platforms (like Android or iOs) where the scrolling is horizontal
  • Different from Windows 8 or tablet UI I think that this scroll should be Paged and not continuous similar to what you have on iOS e Android. This is because the user would be faster to search what he needs (if it is not on the page I see now better scroll a whole page and not a part of it). This won't minimize in any way the live tiles functionality but would give better speed in seeing all I am interested in. 
  • If the user gives titles to the various pages then in the JumpList/SemanticZoom he would see those names otherwise he sees the number of pages and he can easily reach any page (even the last one) without scrolling and scrolling and scrolling.
  • The last page of the start screen that is not full would have the arrow orientated down just to give the hint to the user that the Application full list is "under" the start screen just like in Windows 8.1
Other aspect where Windows 8.1 start screen is better is the tile templates. Windows 8.1, in comparison with windows Phone, has much more templates that fit better the needs of the developers. In Windows Phone you can actually build your own images with everything on it but it would be better to have more standard templates. The current templates when used "as is" are pretty limited:
  • The flip template is "slow" to change from one side to the other and this way not everything you need to see is right in front of you. You should actually put secondary informations on the back and expect that 70% of the time the user would not wait for the tile to flip
  • The iconic template in small and medium sizes have the same informations so it is a "waste" of space to keep the iconic tiles in medium size when you could have them little 
  • The cyclic template is more decorative then functional. Even if you build the images I am curious how many people will actually wait for the images to finish a cycle instead of launching the application. For something like photos app it is ok if the user just want to add decorative items to your start screen
If the Start Screen would be horizontal in this case the application list should be accessed by scrolling vertically just like in the Windows 8.1. The current design of the application list is not optimal it doesn't take advantage of the space it has and because of that you would have to scroll a lot. Even with the Jumplist it is a lot of scrolling. It would be actually better (in my opinion) a paged grid + Jumplist/semantic zoom to easily jump the pages+ Search to easily find an app. Grid design it would even scale better on higher resolutions as it could have more columns. Here is a small comparison (I repeat I am not a designer). Again paged scrolling would give you better speed than continuous scrolling.


Near the search there could actually be a button that enables the user to change the grouping  (alphabetical, most used, recently downloaded,...).

If you read this post and have observations (maybe I am missing something) or ideas please let me know. There is always room to improve the user experience and my only wish is that Windows Phone get better and better each year.

UPDATE: And the most important when implementing horizontal scrolling, new templates apart from better functionality is better transition and familiarity (don't really find the right word) between desktop and phone


NAMASTE

Thursday, November 14, 2013

HID communication for Windows 8.1 Store applications

     I've started thinking about this post a while ago when Windows 8.1 was still in preview (I actually did some testing at that time because I was really excited abouth this new "cool" scenario store applications) and after seeing this Build 2013 session: Apps for HID Devices
     As I did not had the cool missle launcher to play with I have chosen the XBOX360 Wireless controller connected to my PC using an USB adapter similar to this one. One of the reasons why I did this, apart from proof of concept post, is because I have some bluetooth toys that I like to "drive" using the Xbox360 controller (starting with version 8.1 we have full bluetooth support for the Store applications: SPP, OBEX, GATT/BLE ). The Xbox360 controller gives one of the best gaming experience, way better than any touchscreen, keyboard or motion controllers and also enables multiplayer gaming on the same device/screen. 
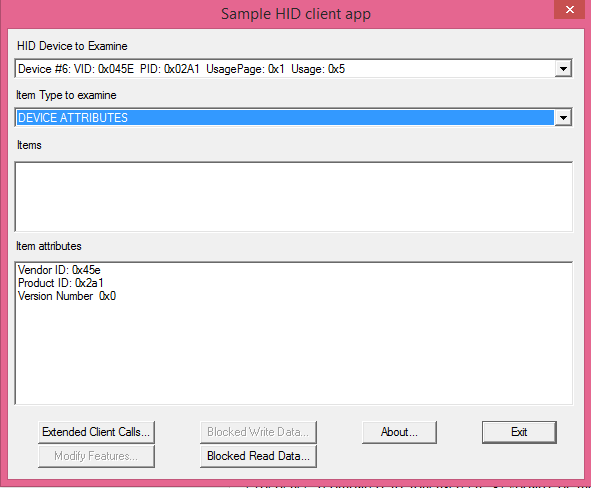
    In order to be able to connect to the Xbox controller we will need to find the VID, PID and UsagePage specific for our device. As I did not know these values I've used the HClient Sample application to retrieve them. To run the HClient sample you will need Microsoft Visual Studio 2013 and, more important, Windows Driver Kit (WDK) 8.1. HClient gives you detailed informations on all the HID devices connected to your PC and to easily find out which HID device is the one you are looking for just disconnect the device from the computer, look at the items inside the list, reconnect the device and identify the new device. This way I identified that my XBOX360 controller has VID: 0x045E, PID: 0x02A1, UsagePage: 0x1, Usage: 0x5  (there might be multiple hardware versions of the desktop adapter that might have different PIDs):  


Selecting the HID Caps for the controller we will see that the input report is 15 bytes long and we don't have an output or a feature report available for this device. This is one of the reasons why, in this case, it would be better to use XInput instead of HID because it would give you access to the lights and the motors inside the controller.

Now that we have the needed values we can start to build our Windows Store application. The first thing we need to do is to set the necessary Capabilities that enable communication between our application and the Xbox controller (manually edit the Package.appxmanifest inside your project using the View code option). In want to know more about the options you can set read How to specify device capabilities for HID.

So I've have added:

  <m2:DeviceCapability Name="humaninterfacedevice">  
    <m2:Device Id="vidpid:045E 02A1">  
     <m2:Function Type="usage:0001 *"/>  
    </m2:Device>  
   </m2:DeviceCapability>  

This way we specify that we only want our application to communicate with devices that have VID 045E and PID 02A1.

Now that we have setup the capabilities we can try to find and connect to and Xbox controller. We will use HidDevice.GetDeviceSelector to generate the query that we will pass to the method DeviceInformation.FindAllAsync that returns an array with all the XBox360 controllers connected to our PC.

   public class Xbox360Controller  
   {  
     public const UInt16 Vid = 0x045E;  
     public const UInt16 Pid = 0x02a1;  
     public const UInt16 UsagePage = 0x01;  
     public const UInt16 UsageId = 0x05;  
   }  

 string selector = HidDevice.GetDeviceSelector(Xbox360Controller.UsagePage,Xbox360Controller.UsageId,Xbox360Controller.Vid,Xbox360Controller.Pid);   
       var deviceCollection = await Windows.Devices.Enumeration.DeviceInformation.FindAllAsync(selector);  
       if (deviceCollection.Count == 0)  
         return "No Xbox360 controller found!";  
       for (int i = 0; i < deviceCollection.Count && i < MaxControllers;i++)  
       {  
         var _device = await Windows.Devices.HumanInterfaceDevice.HidDevice.FromIdAsync(deviceCollection[i].Id, Windows.Storage.FileAccessMode.ReadWrite);  
         if (_device == null)  
         {  
           try  
           {  
             var deviceAccessStatus = DeviceAccessInformation.CreateFromId(deviceCollection[i].Id).CurrentStatus;  
             switch (deviceAccessStatus)  
             {  
               case DeviceAccessStatus.DeniedByUser:  
                 return "User denied the access!";  
               case DeviceAccessStatus.DeniedBySystem:  
                 return "System denied the access!";  
             }  
           }  
           catch { }  
           return "Failed to connect to the controller!";  
         }  
         Controllers.Add(new Controller(_device));  
       }  

 We can connect to any of the devices in the returned array using HidDevice.FromIdAsync by just passing the Id of the HID device. The first time we connect to a new device the user will be prompted to grant permission to the application to communicate with that specific device. Keep in mind that the user can later change the access permissions to each device using the Settings -> Permisssions flyout so you should always check why the connection failed (_device==null) and if DeniedByUser ask him to reenable access to the device.


If everything went fine we are now connected to at least one Xbox360 Controller and we can subscribe the InputReportReceived event. The input report contain all the 15 bytes that we need and we can manually parse the bytes or, even better, we can use the defined structures. In our case we have 10 BooleanControls which are our buttons :

 /*  
       * Buttons Boolean ID's mapped to 0-9 array  
       * A - 5   
       * B - 6  
       * X - 7  
       * Y - 8  
       * LB - 9  
       * RB - 10  
       * Back - 11  
       * Start - 12  
       * LStick - 13  
       * RStick - 14  
       */  

and 6 numerical controls :

       _leftStickX = args.Report.GetNumericControl(0x01, 0x30).Value;  
       _leftStickY = args.Report.GetNumericControl(0x01, 0x31).Value;  
       _rightStickX = args.Report.GetNumericControl(0x01, 0x33).Value;     
       _rightStickY = args.Report.GetNumericControl(0x01, 0x34).Value;  
       _DPAD = args.Report.GetNumericControl(0x01, 0x39).Value;  
       _LT = Math.Max(0, args.Report.GetNumericControl(0x01, 0x32).Value - 32768);  
       _RT = Math.Max(0, (-1) * (args.Report.GetNumericControl(0x01, 0x32).Value - 32768));  

The usageId for the GetNumericalControl method are the ones listed under "INPUT VALUE" section in the "Sample HID client" app.

The Left Trigger and Right Trigger are returned as an unique numerical control value equal to LR-RT value. This is the second reason why XInput is a better choice for communicationg with the Xbox controller (using XInput you have distinct values for RT and LT).

Here is a screenshot from the attached sample application.


SOURCE CODE of XBox360_HID.cs

SAMPLE CODE

NAMASTE

Saturday, September 21, 2013

Retrieve pitch and roll from the accelerometer data [Update]

UPDATE:
You will find an updated version of this post HERE

    So what happens if you designed your application to drive a bluetooth device using the Motion class (because the output is less noisy) and then you realize that on the Lumia 520 and Lumia 625 the Motion class is not supported and you have to use the accelerometer. In my case, as i only use pitch and roll,  the solution was pretty simple as it is actually possible to calculate the pitch and roll values directly from the accelerometer data. This way I can still use the Motion class and when not available fallback on the data extracted from the accelerometer. To better understand the algorithm behind this transformation have a look at this LINK.
     Before applying the transformation I also apply a low-pass filter to remove short-term fluctuations. The difference between the Arduino sample is that the pitch and roll are inverted and also the pitch was 180 degrees off so I remapped the values (when holding in postion 0 it was telling 180 degrees). I also transformed from radians to degrees for easier visualization (the multiplication with 180/Math.Pi)

     const double alpha = 0.5;  
     double fXg = 0;  
     double fYg = 0;  
     double fZg = 0;  
     void acc_ReadingChanged(Windows.Devices.Sensors.Accelerometer sender, AccelerometerReadingChangedEventArgs args)  
     {  
       //Low Pass Filter  
       fXg = args.Reading.AccelerationX * alpha + (fXg * (1.0 - alpha));  
       fYg = args.Reading.AccelerationY * alpha + (fYg * (1.0 - alpha));  
       fZg = args.Reading.AccelerationZ * alpha + (fZg * (1.0 - alpha));  
       //Roll & Pitch Equations  
       double pitch = (Math.Atan2(-fYg, fZg) * 180.0) / Math.PI;  
       double roll = (Math.Atan2(fXg, Math.Sqrt(fYg * fYg + fZg * fZg)) * 180.0) / Math.PI;  
       //rotate 180 degrees  
       pitch=(pitch>=0)?(180-pitch):(-pitch-180);  
     }  

     I have also built a small sample that does comparative plots of the two values using the motion class and the transformation from accelerometer data. Initially I have added also the Microsoft.Devices.Sensors.Accelerometer but the data is almost the same with Windows.Devices.Sensors.Accelerometer with small delays between updates.


    Here is the  SOURCE CODE of the sample.

Saturday, August 31, 2013

Add side menus to an Windows Phone application (similar to the Facebook app)

     It is been a while since my last post, but I have a good reason (on the 20th of July - so tired that the first time I've mistaken the date by one month -  my son Mattia was born and between work and my duties and no sleep there is not much time left for writing on my blog even if I have a lot of posts that I want to do).  
     I will get right to the subject (the title is not one of the best chosen). A few days ago I was talking with my friend Alessandro Scardova about the possibility of implementing side menus inside an Windows Phone application (similar to the ones in the Facebook application). Even if not 100%"Modern UI" design it is a good approach for applications that have multiple options that need to be accessed quickly (also the approach can be applied cross-platform). So I took it as a challange and tried to implement it.
     My initial thought was that I might be able to implement it using an templated panorama or pivot, but after some tests I was not able to get the desired behaviour:


  • when we start the application we will have the selected ViewPort selected
  • swiping left or right we can open/close the side menus
  • also using the buttons on the upper left and on the right corners we can also close and open the side menus
  • the side menus have a width smaller than 480 this way, when opened, we can still see a part of main viewport (including the upper button)
  • when opening the menus the ApplicationBar is not visible
     The solution I have implemented (doesn't use MVVM pattern) it is more a proof of concept on how to implement the functionality. The approach is pretty simple. We have the whole view that we move inside a canvas using manipulations and animations. Initially I thought that I can use only  grid without the canvas and animate the margin of the grid but, as Windows Phone doesn't have ThicknessAnimation, my animations for opening and closing the menus were not very smooth. Also I've tried implementing the swipe behaviour using the Touch.FrameReported event but the results I got were not very good.

     So how does my implementation work:
  • I have a canvas/grid that has a width of 1320 and the height stretches to the whole available height that contains my whole view
  • The view is inserted in a canvas with initial Canvas.Left position set to -420 this way we see the main view port (component)
  • The "stable" positions inside the canvas are:  0: left menu opened, -420: main view and -840:right menu opened
  • When pressing the buttons we will use a resource Storyboard with a  DoubleAnimation to set the the Canvas.Left position inside the canvas to 0,-420 or -840:
  <Canvas.Resources>  
       <Storyboard x:Name="moveAnimation">  
         <DoubleAnimation Duration="0:0:0.2" To="0" Storyboard.TargetProperty="(Canvas.Left)" Storyboard.TargetName="LayoutRoot" d:IsOptimized="True" />  
       </Storyboard>  
     </Canvas.Resources>  

Use the animation to open/close the menus:
  void MoveViewWindow(double left)  
     {  
       _viewMoved = true;  
       if (left==-420)  
         ApplicationBar.IsVisible = true;  
       else  
         ApplicationBar.IsVisible = false;  
       ((Storyboard)canvas.Resources["moveAnimation"]).SkipToFill();  
       ((DoubleAnimation)((Storyboard)canvas.Resources["moveAnimation"]).Children[0]).To = left;  
       ((Storyboard)canvas.Resources["moveAnimation"]).Begin();  
     }  

  • To implement the swipe I use the ManipulationStarted, ManipulationDelta and ManipulationEnded on the canvas container. On delta we set the Canvas.Left value directly (no need for animations) between a maximum of 0 and a minimum of -840.
  private void canvas_ManipulationDelta(object sender, ManipulationDeltaEventArgs e)  
     {  
       if (e.DeltaManipulation.Translation.X != 0)  
         Canvas.SetLeft(LayoutRoot, Math.Min(Math.Max(-840, Canvas.GetLeft(LayoutRoot) + e.DeltaManipulation.Translation.X), 0));  
     }  

  • when swiping we also memorize the initial Canvas.Left position. If substracting the final Canvas.Left and the initial one the absolute value is lower then 100 (not a long swipe) we bounce back to the initial position. Otherwise we move to the next position.
  private void canvas_ManipulationCompleted(object sender, ManipulationCompletedEventArgs e)  
     {  
       var left = Canvas.GetLeft(LayoutRoot);  
       if (_viewMoved)  
         return;  
       if (Math.Abs(initialPosition - left) < 100)  
       {  
         //bouncing back  
         MoveViewWindow(initialPosition);  
         return;  
       }  
       //change of state  
       if (initialPosition - left > 0)  
       {  
         //slide to the left  
         if (initialPosition > -420)  
            MoveViewWindow(-420);  
         else  
           MoveViewWindow(-840);  
       }  
       else  
       {  
         //slide to the right  
         if (initialPosition< -420)  
            MoveViewWindow(-420);  
         else  
           MoveViewWindow(0);  
       }  
     }  


  • _viewMoved is used to see if the view was already moved by another event since our manipulation started (like a button was pressed)
   Here are some screenshots from the sample that you can download and play with:

   Hope you will find it useful.

Here is the SOURCE CODE

NAMASTE!

Saturday, July 13, 2013

Embed YouTube videos into your Windows Phone/Windows 8 app

    That was quite a long time with no blog post, but I am coming back. Recently I had to investigate the possibility to embed youtube videos in an Windows Phone application. The easy way is to simply launch IE with the Uri of the video, but this way you have no control over the video as your app will get suspended. I then had a look at the Youtube client apps available in the Windows Phone Store and saw that some of them integrate the video directly into the app. So wanna know how they are doing this?
   Well there is a library availabe on codeplex called MyToolkit. This library has a class that is able to retreieve the Uri of the video stream directly from the YouTube video id. You can then download the stream for offline access or can directly play the video using the MediaPlayerLauncher. MyToolkit is also available as a nu-get component so you can directly add a reference to it.
     The MyToolkit library is really nice, but what if we could improve it a little bit more and have more control over the video? If we would be able to play the video inside our application page would give us the possibility, for example, to add advertising on top of the video (video apps have a good chance of monetizing using advertising as the user, just like in games, would probably stay longer on that page). For this task we can use Microsoft Player Framework that is available for both Windows Phone 8 and Windows 8. Even more the Player Framework will handle the buffering depending on your connection speed, it is a control inside your page and also will give you full-control over the video playback. (the Player Framework is awesome and is expandible).
    So let's create a small test application. First download and install the Player Framework as it is not available on nu-get (yet). I have used the version 1.3 beta. Then create a new Windows Phone 8 project add reference to the Media Player Framework Windows Phone extension and then, from nu-get, get the MyToolkit.Extended library. For simplicity my MainPage looks like this :

   <Grid x:Name="LayoutRoot" Background="Transparent">  
     <mmppf:MediaPlayer x:Name="player">   
     </mmppf:MediaPlayer>  
   </Grid>  

where mmpf is:
 xmlns:mmppf="clr-namespace:Microsoft.PlayerFramework;assembly=Microsoft.PlayerFramework"  

    Now on Loaded event I use MyToolkit to retrieve the YouTube stream Uri and then pass it to the MediaPlayer:

 private async void PhoneApplicationPage_Loaded(object sender, RoutedEventArgs e)  
     {  
       var videoUri = await MyToolkit.Multimedia.YouTube.GetVideoUriAsync("PQVlW4xbNuI", MyToolkit.Multimedia.YouTubeQuality.Quality480P, MyToolkit.Multimedia.YouTubeQuality.Quality480P);  
       if (videoUri != null)  
         player.Source = videoUri.Uri;  
     }  

    For convenience the page is set to landscape. I don't know if playing Youtube video using this method is 100% legal as it bypasses the advertising (it is what every other windows phone YouTube app is using including the one from Microsoft that was pulled out of the store).
    Also pay attention that there are some videos where the resulting stream is protected/encoded and cannot be played by the Player Framework. One of these videos is Girl on fire by Alicia Keys. Also Microsoft's Youtube app (if you still have it installed ) was not able to open this type of streams and just gives an error while MetroTube, after realizing that it cannot open the stream inside the app, it launches Internet Explorer with the "classic" link to the video.
    The same method and libraries can be used for your Windows 8 store application.

    Here is the Source Code. (the video I use is my own).

NAMASTE

Wednesday, May 15, 2013

Why setting a control Height and Width to 0 is not the brightest idea inside a Windows Phone project

I am doing this small post because I have battled the whole morning with this bug and finally got it and it might save you some time if you read it and have the same problem. 

Scenario: Pivot with two items and at some point the swipe on one of the items doesn't work anymore. Putting a button on the PivotItem that doesn't swipe I can still change the selected item and the second item still swipes correctly.

Cause: I was setting the Height=0 and Width=0 on a control inside the PivotItem (in my project I don't want my control to be collapsed). The problem presents itself if you set any of the controls inside a PivotItem to Height and Width = 0 when the PivotItem is selected. If on the other hand you set the Height and the Width to anything >1 the PivotItem continues to swipe correctly. Even more strange: if the PivotItem is not selected when  you set the Width and Height to 0 and swipe to the control's PivotItem everything will still work correctly. So pay attention better not use set Width and Height =0 on UI controls. 

If you want to test it yourself and maybe tell me what really happens I am attaching a small project created from a Windows Phone Pivot application where I've added a menu that will set the Height and Width of the list inside the first PivotItem to 0. I also set the background of the first PivotItem to green so you will see that it is still expanded. 


How to reproduce the problem: If you execute the menu command with the first PivotItem selected you will see that the pivot doesn't swipe anymore. If you change the values to 1, run the app again and execute the menu with the first PivotItem selected you will see that the pivot still swipes correctly. If, on the other hand, you let the values set to 0 but when executing the menu you have the second PivotItem selected you will see that the first item stil swipes correctly. Bug? Feature? Just pay attention to setting controls to Width and Height 0 because you might have problems with the UI and you won't know what is causing it.


NAMASTE


Monday, May 13, 2013

Fix Panorama layout when upgrading your project to OS 8.0 SDK

  This will be a really short blog post but might save you some time if you have an OS 7.1 Panorama project and decide to upgrade the project to 8.0 SDK. After the upgrade you might see that the layout of your old page changed and you have less content available for the items and also the header looks different. Don't try to fix the problem by changing the margin of the control on the OS 8.0 SDK. The reason why this happens is because the Windows Phone SDK team decided to "tweak" a little bit the default style for the Panorama control, to be more precise the TitleLayer part of the style.
  On Windows Phone OS 7.1 projects the TitleLayer looks like this:

 <controlsPrimitives:PanningTitleLayer x:Name="TitleLayer" CacheMode="BitmapCache" ContentTemplate="{TemplateBinding TitleTemplate}" Content="{TemplateBinding Title}" FontSize="187" FontFamily="{StaticResource PhoneFontFamilyLight}" HorizontalAlignment="Left" Margin="10,-76,0,9" Grid.Row="0"/>  

while on OS 8.0 we have:

 <Primitives:PanningTitleLayer x:Name="TitleLayer" CharacterSpacing="-35" ContentTemplate="{TemplateBinding TitleTemplate}" Content="{TemplateBinding Title}" FontSize="170" FontFamily="{StaticResource PhoneFontFamilyLight}" HorizontalAlignment="Left" Margin="10,-34,0,0" Grid.Row="0"/>  


You can see that not only the margin have changed (the reason why on OS 8.0 version we have less space in the content -44px ), but also the font size changed from 187 to 170 producing these visual differences:


The solution to this problem is pretty simple: extract the old style of the Panorama control (the easiest way is using Blend) and apply to both WP7.1 and OS 8.0 versions of your project. This way the UI will be consistent between the two versions of the app. If you don't want to use Blend I am attaching the default OS 7.1 style so you can directly copy/paste it in your project and apply it to your Panorama control.

 <Style x:Key="PanoramaStyleWP71" TargetType="controls:Panorama">  
                <Setter Property="ItemsPanel">  
                     <Setter.Value>  
                          <ItemsPanelTemplate>  
                               <controlsPrimitives:PanoramaPanel x:Name="panel"/>  
                          </ItemsPanelTemplate>  
                     </Setter.Value>  
                </Setter>  
                <Setter Property="Foreground" Value="{StaticResource PhoneForegroundBrush}"/>  
                <Setter Property="Background" Value="Transparent"/>  
                <Setter Property="Template">  
                     <Setter.Value>  
                          <ControlTemplate TargetType="controls:Panorama">  
                               <Grid>  
                                    <Grid.RowDefinitions>  
                                         <RowDefinition Height="auto"/>  
                                         <RowDefinition Height="*"/>  
                                    </Grid.RowDefinitions>  
                                    <controlsPrimitives:PanningBackgroundLayer x:Name="BackgroundLayer" HorizontalAlignment="Left" Grid.RowSpan="2">  
                                         <Border x:Name="background" Background="{TemplateBinding Background}" CacheMode="BitmapCache"/>  
                                    </controlsPrimitives:PanningBackgroundLayer>  
                                    <controlsPrimitives:PanningTitleLayer x:Name="TitleLayer" CacheMode="BitmapCache" ContentTemplate="{TemplateBinding TitleTemplate}" Content="{TemplateBinding Title}" FontSize="187" FontFamily="{StaticResource PhoneFontFamilyLight}" HorizontalAlignment="Left" Margin="10,-76,0,9" Grid.Row="0"/>  
                                    <controlsPrimitives:PanningLayer x:Name="ItemsLayer" HorizontalAlignment="Left" Grid.Row="1">  
                                         <ItemsPresenter x:Name="items"/>  
                                    </controlsPrimitives:PanningLayer>  
                               </Grid>  
                          </ControlTemplate>  
                     </Setter.Value>  
                </Setter>  
           </Style>  


NAMASTE

Thursday, May 9, 2013

Type forwarding and XAML sharing between WP OS 7.1 and 8.0 projects

    This post is about a new feature available in Windows Phone OS 8.0 SDK called Type Forwarding.

    Have you ever wondered how does the Windows Phone 8.0 SDK handles the fact that the Panorama, Pivot controls changed the namespace and the assembly from OS 7.1 SDK to OS 8.0 SDK? (80% that you haven't :) ). I recently had to migrate an OS 7.1 project to OS 8.0, but also keep the old one (duplicated the old project and upgrade the duplicated one).

    Here is the story of what happens when you upgrade an OS 7.1 project that uses Panaroma or Pivot to OS 8.0:
    If you start a new Windows Phone Pivot App with the target OS 8.0 inside MainPage.xaml the prefix "phone" is used for the Pivot control where "phone" is:

 xmlns:phone="clr-namespace:Microsoft.Phone.Controls;assembly=Microsoft.Phone"  

    If, on the other hand, you create a new Windows Phone Pivot App with the target OS 7.1 inside MainPage.xaml the prefix "controls" is used for the Pivot/Panorama control where "controls" is:

 xmlns:controls="clr-namespace:Microsoft.Phone.Controls;assembly=Microsoft.Phone.Controls"  

    The real "magic" happens when you upgrade the Windows Phone 7.1 project to OS 8.0. The MainPage.xaml page doesn't change (you will still see the "controls" tag is kept in order to be able to better share the code between the versions), but instead a reference to Microsoft.Phone.Controls.dll is added to the OS 8.0 reference that is not used if you create a new project with target OS 8.0. If you wonder if by adding this reference you use the old version of the controls the answer is NO. What this assembly does is that is uses a really neat and new  feature of the .Net compiler called Type Forwarding. This feature can be used when you move a class from one namespace/dll (assembly) to another and you don't want to recompile the application to reference the new dll but you will only deploy the two dlls where the first one (the one that the application already knew uses the Type Forwarding to tell the application that a certain class/es moved to another assembly). In the case of Windows Phone OS 8.0 SDK the usage is even "cooler" as it enables you to use the same XAML for both OS 7.1 projects and OS 8.0 ones. Inside AssemblyInfo.cs of Microsoft.Phone.Controls.dll OS 8.0 version we have all the declarations needed to forward the types to their new locations:

 [assembly: TypeForwardedTo(typeof(Panorama))]  
 [assembly: TypeForwardedTo(typeof(PanoramaItem))]  
 [assembly: TypeForwardedTo(typeof(Pivot))]  
 [assembly: TypeForwardedTo(typeof(PivotItem))]  
 [assembly: TypeForwardedTo(typeof(PivotItemEventArgs))]  
 [assembly: TypeForwardedTo(typeof(AnimationDirection))]  
 [assembly: TypeForwardedTo(typeof(PanningBackgroundLayer))]  
 [assembly: TypeForwardedTo(typeof(PanningLayer))]  
 [assembly: TypeForwardedTo(typeof(PanningTitleLayer))]  
 [assembly: TypeForwardedTo(typeof(PanoramaPanel))]  
 [assembly: TypeForwardedTo(typeof(PivotHeaderItem))]  
 [assembly: TypeForwardedTo(typeof(PivotHeadersControl))]  

I am attaching a small project called TypeForwarding that implements the same functionality as Microsoft.Phone.Controls.dll OS 8.0 version.

Other usages that I can thing of:

  • Flurry SDK changes the name of the namespace for the Api class for WP7SDK to WP8SDK (bad choice when you need code sharing). If you want to keep the same code for the OS 7.1 and the OS 8.0 version of the app you will have to use conditional compiling for every file where you use the Api class. Much easier would be to create an OS 8.0 library project with the default namespace WP7SDK and forward the Api class to the WP8SDK added as a reference to the library project. This way the old WP7SDK will continue to work as it was on the OS 8.0 using the OS 8.0 version of the Flurry SDK.
  • MVVM Light. If you use inside your XAML the EventToCommand this is not xaml shareable between OS 7.1 and OS 8.0 because the assemblies changes from GalaSoft.MvvmLight.Extras.WP71.dll to GalaSoft.MvvmLight.Extras.WP8.dll. The easiest approach in this case (an open source) would be to recompile the dll and use the same name for both versions of the dll. But if you don't have access to the source code of the dll you could use type forwarding.  Also a third approach would be to derive your on class like MyEventToCommand and use this inside the xaml.
Keep in mind this neat feature because you might need it. I would also love to see, in the next version of the SDK, the possibility to use MarkupExtension this way we could conditionally compile parts of the XAML depending on the version of the SDK the app is running on. Have a look at this blog post that explains how it works on WPF projects.


Till next post NAMASTE and have fun coding for Windows Phone!

Wednesday, May 1, 2013

Enable Azure Mobile Services for "pure" Windows Phone 7.1 Xna Games

     Recently somebody asked me for an advice on what library should he use to communicate with an Azure Mobile Service for an Windows Phone OS 7.1 and Windows 8 Xna game. My answer was, of course, the Windows Azure Mobile Services client library available on NuGet as I remembered that the prerelease version works also for Windows Phone OS 7.x applications.

The "problem" is that the library will not install if the game is a pure Xna Windows Phone project.

There are 2 (maybe 3 :) ) solutions to this problem:
1. Migrate your XNA project to an "Windows Phone XAML and XNA App" and on this type of project the client library will install correctly.
2. You could use a small hack in order to force NuGet to install the Azure Mobile Services client library on your XNA project. The hack is pretty simple:
  • open the YourProject.csproj file with an text editor (like Notepad) and add these 3 line (not sure if all 3 of them are needed but doesn't matter as it is only done to force the library to install):
  •  <SilverlightVersion>$(TargetFrameworkVersion)</SilverlightVersion>  
     <TargetFrameworkProfile>WindowsPhone71</TargetFrameworkProfile>  
     <TargetFrameworkIdentifier>Silverlight</TargetFrameworkIdentifier>  
    
  •  Visual Studio will see that the project has been modified so it will ask to Reload the project. Reload it (don't try to build the project as it won't), open the Package Manager Console and write:
     Install-Package WindowsAzure.MobileServices -Pre   
    
    the package should now install.
  • Reopen the .csproj file in Notepad and remove the 3 lines we've previously added, save and reload the project in Visual Studio. The project should compile correctly and you should be able to use the Azure Mobile Services client library.

The only thing that doesn't seem to work is make Visual Studio recognize the await keyword for the XNA project. You will have to use the ContinueWith syntax:

 void TestAzureMobile()  
     {  
       todoitem item = new todoitem { Text = "Awesome item XNA" };  
       ms.GetTable<todoitem>().InsertAsync(item).ContinueWith((task)  
         =>  
       {  
         //do what you need here  
       });  
     }  

3. Came to me while writing the post. Guess the most "elegant" way is to add an Windows Phone Class library to your project, add and use the Azure Mobile Service client library from the class library, reference the class library from your XNA project. Tried this one but the MobileServiceClient seems to fail initialization with 'System.TypeInitializationException'.

Take in consideration that the Azure Mobile Services client library is still a pre-release version in this moment so for the release they might fix/enhance it and you could install it on XNA projects without any hack needed (it is a PCL library).

Wednesday, April 24, 2013

Detect the screen resolution for Windows Phone OS 7.1 applications

    As you probably know Windows Phone 7.1 applications run perfectly on Windows Phone 8 devices. This means that your application/s could run on multiple display resolutions (which are the resolutions supported by Windows Phone 8 devices). If you want to take advantage of the new resolutions (for example downloading higher quality images for higher resolutions devices, fix some minor UI anomalies on higher resolutions) you will need to know the ScaleFactor of the device. The property is only available in the Windows Phone 8.0 SDK, but the good news is that you can access it using reflection.

Solution:
We retrieve the Get method of the ScaleFactor property and invoke it only if the application is running on an Windows Phone 8 device.

Here is the source code:
  public static Size DisplayResolution  
     {  
       get  
       {  
         if (Environment.OSVersion.Version.Major<8)  
           return new Size(480,800);  
         int scaleFactor=(int) GetProperty(Application.Current.Host.Content, "ScaleFactor");  
         switch (scaleFactor)  
         {  
           case 100:  
             return new Size(480, 800);  
           case 150:  
             return new Size(720, 1280);  
           case 160:  
             return new Size(768, 1280);  
         }  
         return new Size(480, 800);  
       }  
     }  
     private static object GetProperty(object instance, string name)  
     {  
       var getMethod= instance.GetType().GetProperty(name).GetGetMethod();  
       return getMethod.Invoke(instance, null);  
     }  

I am also attaching a small sample Windows Phone OS 7.1 test project.


SOURCE CODE

P.S. I think Telerik could use this method to fix this RadToolTip visual anomaly (the 1 pixel width lines that I have filled with blue for contrast) :


NAMASTE

Wednesday, April 17, 2013

3 ways to force the WebBrowser control to logout from Facebook

     Decided to write this post because it took me some time to find the answer. Maybe you already know that if you use OAuth Facebook connect inside your Windows Phone application there is one step where you use the WebBrowser control to let the user authenticate on the Facebook server and authorize your app. The "problem" presents itself when you want to link another user because the WebBrowser control has already memorized the old credentials and will automatically use them. What needs to be done is to logout the old user from the WebBrowser without actually telling the user to go on the web page and click logout. I have found 3 easy ways to do that: the first two will work on both Windows Phone 7.x and Windows Phone 8 and are Facebook specific and the third one will only work on Windows Phone 8 (generic method for OAuth providers). The 3 methods can use the WebBrowser control headless (you don't actually have to show the WebBrowser control to the user and don't even have to have the webbrowser attached to a Page):  

Method 1: described by Rene Schulte in this blog post  
The method constructs the logout Uri using your AppId and a SessionKey that is obtained from the AccessToken you got when the user authenticated.

Get the SessionKey:
  private static string ExtractSessionKeyFromAccessToken(string accessToken)  
     {  
       if (!String.IsNullOrEmpty(accessToken))  
       {  
         var parts = accessToken.Split('|');  
         if (parts.Length > 2)  
         {  
           return parts[1];  
         }  
       }  
       return String.Empty;  
     }  

Obtain the logout Uri:
  public Uri GetLogoutUri(FacebookCredentials credentials)  
     {  
       var sessionkey = ExtractSessionKeyFromAccessToken(credentials.AccessToken);  
       var url = String.Format("http://facebook.com/logout.php?app_key={0}&session_key={1}&next={2}", EndpointData.FacebookAppId, sessionkey, EndpointData.FacebookLogoutCallbackUrl);  
       return new Uri(url);  
     }  

Make the WebBrowser navigate to the logout Uri:
 Browser.Navigate(FacebookService.GetLogoutUri(EndpointData.Settings.Facebook));  

Method 2:
If for some reason you don't have the Facebook AppId available (my case) you can use the WebBrowser to navigate to the Logout page https://www.facebook.com/logout.php and after the page gets loaded you just execute the script document.forms['logout_form']:
 wb.LoadCompleted += wb_LoadCompleted;  
 wb.Navigate(new Uri("https://www.facebook.com/logout.php"));  
Once the page gets loaded:
 void wb_LoadCompleted(object sender, System.Windows.Navigation.NavigationEventArgs e)  
     {  
       wb.LoadCompleted -= wb_LoadCompleted;  
       if (wb.SaveToString().Contains("logout_form"))  
         wb.InvokeScript("eval", "document.forms['logout_form'].submit();");  
     }  

Method 3:
This is the easiest one, but will only work on Windows Phone 8: call the new WebBrowser async method ClearCookiesAsync(). This method works for every OAuth provider (Dropbox, Box, Skydrive, Picasa, Flickr, Google Drive... infinite list).

NAMASTE

Tuesday, April 2, 2013

Smooth scrolling content on Windows Phone

     Gotta say that I am not 100% satisfied about the title of this blog post, but since I haven't found a better one I will use this one (don't get it wrong windows phone has smooth scrolling implemented). This post is focusing on how to smooth scroll the content of a ScrollViewer. If you are using the ScrollViewer you know that it already has the method ScrollToVerticalOffset that can be used to manually scroll the content but this method doesn't have any animation implemented so you will see only a fast redraw of the new content without getting the "feeling" that the content scrolled to the new position. The easiest way to achieve this task would be using a StoryBoard with an Animation on the property VerticalOffset of the ScrollViewer, but VerticalOffset is a read-only property so it cannot be set and therefore cannot be used for animation.
     The solution I found was to build a custom control and add a custom property that can be used as a target for a DoubleAnimation. The attached sample (see the link at the end of the post) is using a ListBox as the content of my Custom Control but you can use anything else inside the control (a better approach for the ListBox would be to create a custom control derived directly from ListBox and use the built-in ScrollViewer). 
      Let's start from the XAML part of the User Control:

  <ScrollViewer x:Name="scroller">  
     <ContentPresenter Content="{Binding ContentArea, ElementName=userControl}"/>  
  </ScrollViewer>  

    So we have a ScrollViewer which inside has a ContentPreseter that has its content binded to the control's property ContentArea. Now let us have a look at the .cs code.

 public static readonly DependencyProperty VerticalOffsetProperty = DependencyProperty.Register("VerticalOffset",  
       typeof(double), typeof(SmoothScroller), new PropertyMetadata(VerticalOffsetPropertyChanged));  
     public double VerticalOffset  
     {  
       get { return (double)this.GetValue(VerticalOffsetProperty); }  
       set { this.SetValue(VerticalOffsetProperty, value); }  
     }  
     private static void VerticalOffsetPropertyChanged(object sender, DependencyPropertyChangedEventArgs args)  
     {  
       SmoothScroller cThis = sender as SmoothScroller;  
       cThis.scroller.ScrollToVerticalOffset((double)args.NewValue);  
     }  
     public static readonly DependencyProperty ContentAreaProperty = DependencyProperty.Register("ContentArea", typeof(object), typeof(SmoothScroller), null);  
     public object ContentArea  
     {  
       get { return (object)GetValue(ContentAreaProperty); }  
       set { SetValue(ContentAreaProperty, value); }  
     }  

     The property that we will use for animation is the VerticalOffset that uses the method VerticalOffsetPropertyChanged to scroll to a vertical offset inside the control's scroller. The property VerticalOffset can be animated and we will use it to smooth scroll the ListBox content.
     Here is the content of the MainPage.xaml

  <uc:SmoothScroller x:Name="smoothScroller">  
         <uc:SmoothScroller.ContentArea>  
         <ListBox x:Name="lstItems" ItemsSource="{Binding Items}" ScrollViewer.VerticalScrollBarVisibility="Disabled" ScrollViewer.HorizontalScrollBarVisibility="Disabled" ItemTemplate="{StaticResource DataTemplate}" >  
           <ListBox.ItemContainerStyle>  
             <Style TargetType="ListBoxItem">  
               <Setter Property="HorizontalContentAlignment" Value="Stretch"></Setter>  
             </Style>  
           </ListBox.ItemContainerStyle>  
         </ListBox>  
         </uc:SmoothScroller.ContentArea>  
       </uc:SmoothScroller>  

     So we have the SmoothScroller control which inside its ContentArea has a ListBox (the ListBox has it's scrollviewer disabled). What the sample does is it is changing the selected item every second (incrementing the selectedindex) and scrolls the content so that the newly SelectedItem is centered in the ScrollViewer. Here is the code used for scrolling:

  void dt_Tick(object sender, EventArgs e)  
     {  
       ((ListBox)smoothScroller.ContentArea).SelectedIndex = idx;  
       var container = ((ListBox)smoothScroller.ContentArea).ItemContainerGenerator.ContainerFromIndex(idx) as FrameworkElement;  
       var transform = container.TransformToVisual(smoothScroller.scroller);  
       var elementLocation = transform.Transform(new Point(0, 0));  
       double newVerticalOffset = elementLocation.Y + smoothScroller.scroller.VerticalOffset - smoothScroller.scroller.ActualHeight / 2 ;  
       //Animate transition  
       DoubleAnimation verticalAnimation = new DoubleAnimation();  
       verticalAnimation.From = smoothScroller.scroller.VerticalOffset;  
       verticalAnimation.To = newVerticalOffset;  
       verticalAnimation.Duration = new Duration(TimeSpan.FromMilliseconds(500));  
       var sb = new Storyboard();  
       sb.Children.Add(verticalAnimation);  
       Storyboard.SetTarget(verticalAnimation, smoothScroller);  
       Storyboard.SetTargetProperty(verticalAnimation, new PropertyPath(SmoothScroller.VerticalOffsetProperty));  
       sb.Begin();  
       idx++;  
       if (idx >= 56)  
         dt.Stop();  
     }  

     Pretty basic: select the new index in the ListBox, calculate the new VerticalOffset so that the newly selected item is centered in our scrollviewer and create and start a 500ms animation for the SmoothScroller.VerticalOffsetProperty. Anyway I am sure that you will better understand how it works when you will try the sample code.
     The sample is far from perfect (before starting a new animation I should check if the old one finished, should not automatically scroll when the user is manipulating the list,...).
     Here is a screenshot from the sample:

As usual let me know if you need help. The code works on both Windows Phone 7.1 and Windows Phone 8 SDK.

SOURCE CODE


Sunday, March 24, 2013

Small tip on XAudio2 for Windows Phone

     While debugging one of my Windows Phone applications on the device I've noticed that after the debug session the battery of the device drained faster than usual (so I always restarted the device after using it for debugging). Initially I thought it was the Bluetooth driver but I saw that if I stop the XAudio2 engine when my application gets suspended and re-enable it when the application resumes my battery drains "normally". This should be a best practice as your application doesn't really need the engine when it gets suspended. So:


NAMASTE

Friday, March 22, 2013

How to add songs to the emulator's MediaLibrary

    One of the new features of the Windows Phone 8 SDK is the ability to save(add) songs to the phone's MediaLibrary. This is a really nice when you add songs to the MediaLibrary any other music application that you have installed on your phone can play the songs that your application has saved.. The SaveSong method is found in the MediaLibraryExtensions class. Here are the parameters of this method:

[ExtensionAttribute]

public static Song SaveSong (
         MediaLibrary library,
         Uri filename,
         SongMetadata songMetadata,
         SaveSongOperation operation
)

    The method requires the ID_CAP_MEDIALIB_AUDIO capability and will return a reference to the newly saved song. One of the things that the documentation forgot to mention is that the filename Uri has to be an Uri to a file on the IsolatedStorage. You cannot give a direct Uri to an asset file (this I think because using the SaveSongParameter you can choose if you want to copy or move the file to the MediaLibrary) as you will get InvalidOperationException. If you want to add a song deployed as an asset you will first have to copy the file to the IsolatedStorage and then save it to the MediaLibrary.

    To copy the file to the IsolatedStorage you can use the:
 var resource = Application.GetResourceStream(new Uri(@"Assets/Songs/"+fileName, UriKind.Relative));  
 resource.Stream.CopyTo(fileStream, 4096);  


or you can use the WinRT Api to read the asset file:
  songUri=new Uri("ms-appx:///Assets/Songs/"+fileName,UriKind.Absolute);  
  var file=await Windows.Storage.StorageFile.GetFileFromApplicationUriAsync(songUri);  

 
    One interesting parameter is the SongMetadata. This enables you to "mess" with the metadata that will be saved to the MediaLibrary. If this parameter is null then the function will automatically import the file's metadata. If you still want to verify/import just some of the files metadata you can use the PCL ID3.NET and read the metadata of the file you have on the Isolated Storage. The portble dll is Id3.dll. You just have to pass the Stream to the Mp3Stream method:

 Id3.Mp3Stream mp3 = new Id3.Mp3Stream(resource.Stream);  
 if (mp3.HasTags)  
 {  
 }  


NAMASTE

Monday, March 18, 2013

How to debug Windows Phone HTML5 Apps

  Debugging HTML applications is never an easy task and until today I did not know how to approach this for Windows Phone HTML5. The technique I will describe in this post can be applied also for Windows Phone 7.1 applications using Phonegap or Android/iOS applications.
   The "secret" tool for debugging the html content inside our applications is called WEINRE which comes from WEb INspector REmote. Weinre is a debugger for web pages, like FireBug (for FireFox) and Web Inspector (for WebKit-based browsers), except it's designed to work remotely, and in particular, to allow you debug web pages on a mobile device such as a phone. 
    In order to install Winre you will need to download and install NodeJS


    Once you have installed NodeJS restart your machine this way you will be able to run the NodeJS commands from the command prompt. After restart open a command prompt window and run this command:
 npm install weinre -g  
This will install the Weinre package globally. This is what you should see in the Command Prompt window:


    When the installer has finished its work you are ready to run the Weinre server on your PC. Execute this command from the Command Prompt:
 weinre --boundHost -all- --debug -true  
    With these parameters Weinre should also open the firewall port. For more parameters have a look at this page. You can verify if the server started by opening a browser page and loading 127.0.01:8080 (8080 is the default port for Weinre). If you are seeing this page then the server is running:


   Now click on the Debug Client User Interface link where you will be able to see if any client is connected and debug the connected clients.
    Let's create the Windows Phone HTML5 application. Use the SDK template to create a new project, open the page index.html inside the folder Html and add this line to the head section:
 <script src="http://[the server ip]:8080/target/target-script-min.js#anonymous"></script>  
replace [the server ip] with the IP of the PC running the Winre server and run the application. If everything went as we expected in the Debug Client user Interface on the Server we should see one Target connected:
    Once the target Windows Phone page is connected you can inspect and change the DOM in real-time, execute javascripts:


    In this particular case I've only changed the background of the page but you can do whatever you want. Here you can find further details on how to use the Server User Interface.
    Using the Console panel you can execute arbitrary JavaScript expressions/statements. It also shows the output from various console methods, like console.log().


    This is pretty much everything. Simple and veryyyyyy useful if you need to debug your HTML5 windows phone applications.
    As usual don't hesitate to contact me if you have further questions.

NAMASTE